Please subscribe here


|
CAR RESTORATION -HOW TO MIG WELD ON CAR PANELS
So here is the deal! You have a car and it needs new metal put in. Yeah, you could go with body filler, but what about parts like the chassis? If you have a MIG welder it can help you do all metal joining repairs. Some people like to gas weld or even stick weld, but the main problem with those welding processes is distortion! MIG is clean, fast, and works great with the thin metals that are used on cars, plus it is what most body shops use! The down side is you need to buy, rent or borrow one of these machines. For a few hundred dollars you can easily find one for sale, and in the worst case you can pick up a real nice pre-owned machine! MIG welding on cars is pretty easy. All you need is the machine and the filler wire. When it comes to filler wire there are two ways to go. Solid wire or a self shielding wire. There are pros and cons to both choices. The solid wire makes a cleaner weld, but that also means you need to get a bottle of CO2. The self shielding wire does not need any gas, but the welds need to be cleaned more after they are finished. Either way, it beats using body filler to patch up holes! Set up of the machine depends upon the metal you are welding and it's thickness. It is recommended that you first select a piece of scrap metal that is the same thickness and type of metal as the one you will be welding and practice welding on the scrap. Set the machine so that when it is welding it has a fast crackling sound to it. Once you've got it down, it's time to prepare your car's metal. Prep work for metal repairs on cars requires cleaning the joint so that only clean steel is showing. This is not just for cars but MIG welding in general. You want everything fit up as tight as possible so that there are no gaps. Another thing to look out for before getting started is anything flammable in your work area. The last thing you want to do is set your garage on fire! Now you are ready to weld. When welding thin metals, the only technique employed is that of a whipping motion. Simply point the MIG gun and pull the trigger as you wave it back and forth until you fuse the edges of the joint together. Once you're finished with the welds, grind down the welds until they are flush with your vehicle's surface. Those are the basics of MIG welding for your car restoration needs! Safe welding! My name is David Zielinski and I am a Certified Welder. If you would like more information about MIG welding techniques then visit my website http://www.GoWelding.Org. All of the information is free and it is full of accurate, hard-to-find, real-life welding tutorials! Article Source: https://EzineArticles.com/?expert=David_Zielinski
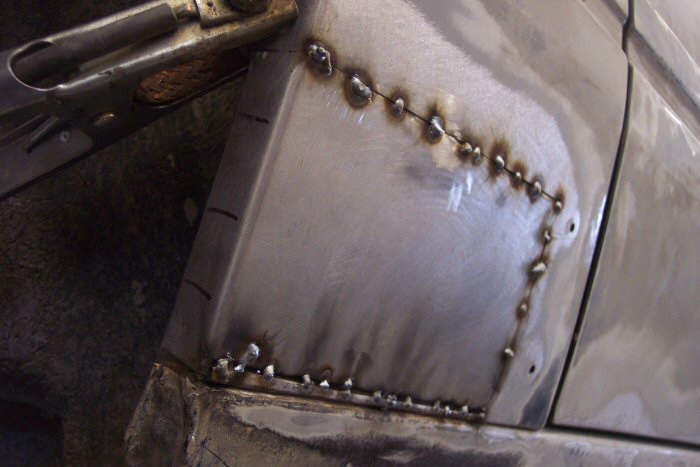
SOME MORE GREAT INFO.............I thought that I'd delve in to an article about fixing rust in the body of your classic car, this is a huge problem if your buying or own a classic cars that came from a place near the sea, or a place where they use salt on the roads to melt the snow, rust in most cases will start underneath the car and work it's way up destroying anything in it's path along the way, nothing will stop rust or slow it down in it's effort to destroy your classic car's body. There are a few ways to fix rust problems in your car, but first you must find them, you can start by looking for bubbles in the painted surface of the car, and do not take it lightly when you find it, don't look at it and think that just because it seems to be only on the surface that it is, rust will hide in cracks, underneath seem sealer, under that carpet, or any place else that it can, believe be the rust knows that you don't want it in your car, so look at it like a doctor would look a cancer. To check how bad the rust is, take a body hammer with a pick on one end, and use that end to lightly tap the rusted spot that you have found, if the metal seems like it's soft and moves easily, then you needs to fix this area now, in some cases you'll knock a hole in the area that your tapping on wit the hammer, don't worry about this, it won't be there for long if you fix the rust hole the right way. What you'll need to do the job, is a, air compressor, a die grinder with a cutting blade on it, do yourself a favor and make sure that you have more then one cussing blade for that grinder, you'll need sheet metal, the same gage as your car, if you don't know what gage it is, you'll also need a 5" air grinder loaded with a 40 grit disc to finish the welds with, then you'll need to buy a metal gage checking tool, and last but not least you'll need a MIG welder with plenty of gas and wire, there are other ways to fix a rust spot without a welder, but in my opinion they are not as reliable. Now that you have your tools all together and your courage up to the right level where you can begin the job, you'll want to determine how big the rusted area is by tapping it with the pick end of that body hammer until you run in to areas on all sides of the rust that don't seem soft, or like they don't have any strength to them, once you have discovered how big the rusted area is you need to get a sharpie and draw a line around the rusted area, about 2" in to the good metal all the way around the rusted area, so you know that the rust will be gone when you cut it out, rust is not easy to weld to, so make 100% sure that it's all the way gone. Now that you have your line to cut to all drawn out with the sharpie, you can plug the die grinder in to the air source, now a word of advise here, don't try to cut it all at one time, put a light cut along the line that you drew with the sharpie, just repeat the process of running the die grinder along that line until the rusted area falls out of the car, now that the rusted metal is out of your car, pick up the rusted piece of metal and lay it on top of your new sheet metal, take that sharpie that you used to draw the first line to cut to, and using the rusted piece of metal draw a line to it with the sharpie, using the same process that you did on the rusted spot in your car, cut the piece of good metal out with the die grinder. The die grinder has left a rough edge on the back of the good piece of metal, you'll need to clean that up, the best way to do this is to take that 5" grinder that you have with the 40 grit disc on it, and lightly run it over the back of the metal until all the burs are gone, now you'll need to that 5" grinder with the 40 grit disc on it, and clean the area on your car where you cut the rust our, make sure that you have about 2" of bare clean metal around the area that you cut out. Now take that good piece of metal that you cut from your sheet of repair metal, and fit it in the hole that you cut out of your car, I usually use visegrips to hold the new metal in place, now this is where things can get a little tricky, so pay close attention this section, make sure that you have a good place to put the grounding clamp for your welder, if you don't see a place for it right close to your work area, then take that 5" air grinder and make one, make sure that the clamp has a solid connection. Plug you welder in, and make sure that the gas is turned on, I usually run the wire feed, and current set at about 3 or 4 on my MIG, but this could be different on your machine, so do yourself a favor and test it before putting it to your car, now that we're all ready to go, you have the visegrips holding the metal in place and you have your welder setup right, your going to want to run about a 1" bead on the top, bottom, and both sides, and then you can get the visegrips out of your way. Now you have four weld beads holding the patch panel in place, now heres a bit more advise, mig welders get very hot, and it's possible to warp the metal in your car while welding the patch panel in place, so never weld more then 1" beads at a time, and move from the top to the bottom, do a 1" weld on the top of the patch, and then cool it off with a little air, and the do a 1" weld on the bottom and cool it off, and the do the same thing with the sides, until you have one solid bead all the way around the patch panel, you have now fixed your rust problem, all that's left is the finish work on the welds. Grab your 5" air grinder with the 40 grit disc and grind the welds flat, in most cases you should not even be able to see the welds if you have done it right, the job is now complete, I'll move on to the body work part in a later article.
ZL1 Corvette Auto Shop Search I've been in the automotive business for about 20 or 25 years, I have worked in all facets of the industry, from parts to restoration, all different makes and models, I just want to keep people interested in the old cars because it's where my heart is. http://autorevival.com Article Source: https://EzineArticles.com/?expert=David_Atkin
|